
Mikuni Carb Tuning Manual: A Comprehensive Plan
This manual details Mikuni carburetor tuning, covering adjustments for optimal snowmobile and motorcycle performance․ Resources like YouTube videos and blogs offer guidance on needle and throttle valve adjustments․
Understanding jetting and float levels is crucial for smooth operation, especially when adapting to varying altitudes and temperatures․ Proper tuning maximizes power and fuel efficiency․
Mikuni carburetors are renowned for their precision and performance, widely utilized in motorcycles, snowmobiles, and various small engine applications․ Their popularity stems from a design focused on delivering a finely atomized fuel-air mixture, crucial for efficient combustion and optimal power output․ Unlike simpler carburetor designs, Mikuni carbs often feature sophisticated circuits – pilot, needle, main, and power jet – each responsible for fuel delivery across different throttle positions and engine speeds․
Understanding these circuits is fundamental to successful tuning․ The pilot circuit governs idle and low-speed operation, the needle jet controls the mid-range, and the main jet handles full-throttle performance․ The power jet adds extra fuel during heavy acceleration․ Effective tuning involves balancing these circuits to achieve a smooth, responsive engine across the entire RPM range․
Resources available online, such as instructional videos on platforms like YouTube, demonstrate the intricacies of Mikuni carburetors․ These resources often highlight the importance of proper jetting and float level adjustments․ Mikuni’s design philosophy emphasizes adjustability, allowing riders and mechanics to tailor the carburetor’s performance to specific engine modifications, altitude changes, and ambient temperatures․ Mastering these adjustments unlocks the full potential of your engine․
Understanding Carburetor Components
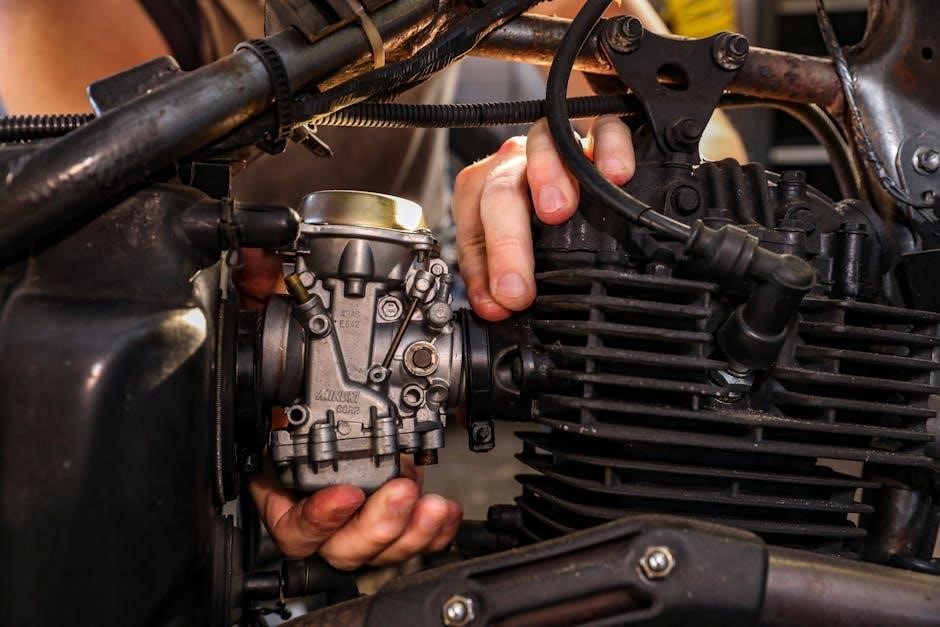
A Mikuni carburetor comprises several key components working in harmony to deliver the correct fuel-air mixture․ The float bowl maintains a consistent fuel level, regulated by the float and needle valve․ The main jet controls fuel flow at high throttle openings, while the needle jet and jet needle manage the mid-range․ The pilot jet and pilot screw govern the idle and low-speed circuits․
The throttle valve, controlled by the throttle cable, regulates airflow through the carburetor․ The diaphragm, as seen in BS34 models, plays a crucial role in throttle response․ Accelerator pumps provide a momentary burst of fuel during rapid throttle opening, preventing lean spots․ Understanding the function of each component is vital for effective tuning․
Online resources often visually demonstrate these parts and their interactions․ Properly functioning components are essential; a worn diaphragm or clogged jet can significantly impact performance․ Regular inspection and cleaning are recommended․ Adjustments to these components, like changing jets or adjusting the needle position, directly influence the engine’s fuel mixture and overall responsiveness․

Tools Required for Mikuni Carb Tuning

Successful Mikuni carburetor tuning demands a specific toolkit․ Essential items include a set of screwdrivers – both flathead and Phillips – in various sizes, for adjusting pilot screws and jet access․ A jet kit containing a range of main and pilot jets is crucial for experimentation․ Needle jet and jet needle sets allow for fine-tuning the mid-range circuit․
A spark plug wrench is needed for inspecting plug condition, a key indicator of mixture accuracy․ Calibrated drill bits can verify jet sizes․ A vacuum gauge assists in carburetor synchronization for multi-carb setups․ Digital Multimeter is useful for checking electrical components related to the carb․
A fuel pressure gauge ensures consistent fuel delivery․ Small containers for draining fuel and cleaning parts are also necessary․ Compressed air is vital for blowing out jets and passages․ Safety glasses and gloves are paramount for protection․ Having the right tools streamlines the tuning process and ensures accurate adjustments, ultimately leading to optimal engine performance․
Safety Precautions During Tuning
Carburetor tuning involves flammable fuels and potentially hot engine components; therefore, strict safety measures are essential․ Always work in a well-ventilated area to prevent the accumulation of fuel vapors․ Disconnect the battery’s negative terminal to avoid accidental sparks․ Wear safety glasses to protect your eyes from fuel splashes and debris․
Use appropriate gloves resistant to gasoline and other solvents․ Never smoke or work near open flames while handling fuel․ Ensure a fire extinguisher is readily accessible․ Allow the engine to cool completely before disassembling the carburetor to prevent burns․
Properly dispose of used fuel and cleaning solvents according to local regulations․ Avoid spilling fuel on hot surfaces․ Double-check all connections after reassembly to prevent leaks․ If unsure about any procedure, consult a qualified mechanic․ Prioritizing safety ensures a trouble-free tuning experience and protects you from potential hazards․
Initial Carburetor Setup
Before commencing tuning, ensure the Mikuni carburetor is in a baseline state․ Begin by verifying the float level is set to the manufacturer’s specifications – typically around 22-25mm․ Inspect the throttle slide for smooth operation and proper spring tension․ Confirm the needle jet and jet needle are correctly installed and at their standard positions․
Clean all fuel passages using carburetor cleaner to remove any debris or varnish․ Check the diaphragm for tears or punctures, replacing it if necessary․ Ensure all screws are tightened but not over-tightened, preventing damage․ Verify the choke mechanism functions correctly, allowing for easy engine starting․
Install a new spark plug and gap it according to the engine manufacturer’s recommendations․ Connect the fuel line and check for leaks․ This initial setup provides a reliable foundation for subsequent tuning adjustments, ensuring optimal performance and preventing potential issues during the process․
Float Level Adjustment
Precise float level adjustment is critical for consistent fuel delivery․ An incorrect level causes lean or rich mixtures, impacting performance․ To adjust, carefully remove the float bowl, ensuring no debris enters the carburetor․ Measure the float height from the carburetor body to the float’s lowest point when the carburetor is held horizontally․
Typically, Mikuni carburetors require a float level between 22-25mm, but consult your specific model’s manual․ Gently bend the metal tab that contacts the needle valve to adjust the float height․ Small adjustments make a significant difference; measure after each bend․ Reassemble the float bowl, ensuring a tight seal to prevent fuel leaks․

Verify the adjustment by observing the fuel level in the bowl after reassembly․ An overly high level causes flooding, while a low level leads to lean running․ Accurate float level ensures optimal fuel metering, contributing to smooth engine operation and efficient combustion․
Pilot Screw Adjustment
The pilot screw, also known as the fuel screw, controls the fuel mixture at idle and low throttle openings․ Adjusting it correctly ensures smooth idling and crisp throttle response from a standstill․ Locate the pilot screw, typically on the carburetor body near the engine side․ Before adjustment, ensure the engine is warmed up to operating temperature․
Start by gently turning the pilot screw in (clockwise) until the engine begins to stumble or slow down․ Then, slowly turn it out (counterclockwise) until the engine reaches its highest idle speed․ From this point, continue turning the screw out in ¼-turn increments, allowing the engine to stabilize after each adjustment․
Listen for the point where the idle speed begins to drop․ Turn the screw back in slightly until the idle speed is maximized․ Fine-tune the idle speed with the idle speed screw after pilot screw adjustment․ Proper pilot screw setting eliminates hesitation and ensures a clean, stable idle․
Idle Speed Adjustment
Adjusting the idle speed is crucial for smooth engine operation when stationary․ It ensures the engine doesn’t stall and responds promptly to throttle input․ Locate the idle speed screw, usually positioned on the carburetor body, often near the throttle linkage․ Prior to adjustment, confirm the pilot screw is correctly set, as it significantly impacts idle quality․
Turn the idle speed screw clockwise to increase the idle speed and counterclockwise to decrease it․ Make small adjustments, observing the engine’s response․ Use a tachometer to accurately monitor the RPM, aiming for the manufacturer’s recommended idle speed – typically between 1000-1500 RPM, but consult your vehicle’s specifications․
Avoid setting the idle speed too high, as this can cause clutch slippage or difficulty shifting․ Ensure the throttle slides open smoothly and doesn’t stick at idle․ After adjustment, blip the throttle to verify a clean and responsive transition from idle to slightly increased RPM․ A properly adjusted idle speed contributes to overall rideability․
Main Jet Selection
Selecting the correct main jet is vital for optimal performance at wide-open throttle․ The main jet controls fuel delivery during high-RPM, high-load conditions․ Incorrect sizing leads to either a lean condition (insufficient fuel, risking engine damage) or a rich condition (excess fuel, causing sluggishness and fouling)․
Start with the manufacturer’s recommended main jet size for your engine displacement and riding conditions․ Consider altitude and temperature; higher altitudes require smaller jets due to reduced air density, while warmer temperatures may necessitate slightly larger jets․ Observe the spark plug color after a full-throttle run – a light tan or chocolate brown indicates correct jetting․
A white or grey spark plug suggests a lean condition, requiring a larger main jet․ A black, sooty plug indicates a rich condition, necessitating a smaller jet․ Change jet sizes incrementally (typically in steps of 2-4), retesting after each adjustment․ Proper main jet selection ensures maximum power and prevents engine damage․
Needle Jet and Jet Needle Adjustment

The needle jet and jet needle govern fuel delivery in the mid-range throttle position, a critical area for smooth transitions and responsive acceleration․ The jet needle’s position within the needle jet dictates the fuel mixture as the slide opens․ Adjusting the clip position on the jet needle alters this fuel delivery․
Raising the clip enriches the mixture, providing more fuel, while lowering the clip leans it out․ Start with the clip in the middle position and adjust based on engine response and spark plug readings․ Hesitation or a lean surge indicates a need to raise the clip (enrich the mixture)․ A bogging or rich feeling suggests lowering the clip (lean the mixture);
The needle jet itself can be changed to fine-tune the mid-range․ Larger needle jets deliver more fuel, while smaller ones deliver less․ Consider this adjustment after optimizing jet needle clip position․ Proper needle jet and jet needle adjustment ensures crisp throttle response and prevents mid-range issues․
Power Jet Adjustment
The power jet circuit delivers additional fuel at wide-open throttle, supplementing the main jet to maintain a proper air-fuel ratio during maximum engine load․ It’s crucial for preventing lean conditions at high RPMs, which can lead to engine damage․ Power jet adjustments typically involve changing the size of the power jet itself․
A larger power jet increases fuel flow, enriching the mixture, while a smaller power jet reduces fuel flow, leaning it out․ Symptoms of a lean power jet include a flat spot at wide-open throttle or a white spark plug․ A rich power jet manifests as black smoke or a fouled spark plug․
Begin with the manufacturer’s recommended power jet size and adjust incrementally․ Changes should be made in conjunction with main jet adjustments to ensure a balanced fuel curve․ Always prioritize a slightly richer condition over a lean one to safeguard the engine․ Careful power jet tuning unlocks maximum performance and reliability․
Accelerator Pump Adjustment
The accelerator pump provides a momentary burst of fuel when the throttle is rapidly opened, preventing a lean stumble during initial acceleration․ Proper adjustment is vital for smooth transitions from idle to full throttle, enhancing rideability and responsiveness․ Adjustment typically involves regulating the amount of fuel delivered and the duration of the pump’s activation․
Too little fuel from the pump results in a hesitation or bogging sensation when accelerating․ Conversely, excessive fuel causes a momentary rich spot and potential four-stroke sputtering․ Adjustment is usually achieved by altering the pump arm’s position or the pump nozzle’s size․

Start with the factory settings and make small adjustments, testing after each change․ Observe the spark plug color during acceleration – a light tan indicates a correct setting․ A black, sooty plug suggests a rich condition, while a white plug indicates a lean one․ Fine-tuning the accelerator pump ensures crisp, immediate throttle response․
High-Speed Circuit Tuning
The high-speed circuit controls fuel delivery at wide-open throttle (WOT), dictating performance at maximum engine load and speed․ Tuning this circuit is crucial for achieving optimal power and preventing engine damage from lean conditions․ The primary adjustment point is the main jet, which regulates the amount of fuel flowing through the main circuit․
Selecting the correct main jet size is paramount․ A jet that is too small will result in a lean mixture, potentially causing overheating and engine failure․ A jet that is too large will create a rich mixture, leading to reduced power and fouled spark plugs․ Plug chops – examining the spark plug’s color after a WOT run – are the primary method for determining jetting accuracy․

A tan or light brown plug indicates a correctly jetted condition․ Black and sooty signifies a rich mixture, requiring a smaller jet․ White or very light tan indicates a lean condition, necessitating a larger jet․ Adjust in small increments, and always prioritize engine safety by erring on the side of richness during initial tuning․
Mid-Range Circuit Tuning
The mid-range circuit governs fuel delivery during throttle openings between idle and wide-open throttle, a critical zone for acceleration and overall rideability․ This circuit is typically controlled by the needle jet and jet needle, working in conjunction to provide a smooth transition․ Incorrect mid-range tuning manifests as hesitation, bogging, or a generally unresponsive engine feel․
Adjusting the jet needle’s clip position alters the fuel mixture․ Raising the clip enriches the mixture, while lowering it leans it out․ Small adjustments are key; one clip position can make a noticeable difference․ The needle jet itself determines the overall fuel flow characteristics in this range, and swapping to a different size may be necessary for significant tuning changes․
Symptoms like a lean surge or stumble during acceleration often indicate a lean mid-range, requiring enrichment․ Conversely, a sluggish response or black smoke suggests a rich condition, demanding a leaner setting․ Plug readings in this range are less definitive than at WOT, so focus on subjective feel and throttle response․
Troubleshooting Common Tuning Issues
Several recurring problems plague Mikuni carburetor tuning․ A frequent issue is a black, sooty spark plug, indicating an overly rich mixture․ This can stem from an incorrect float level, a too-large main jet, or a clip position too high on the jet needle․ Conversely, a white or very light tan plug signals a lean condition, potentially caused by a low float level, a small main jet, or a clip position too low․
Hesitation upon acceleration often points to a lean mid-range, requiring adjustments to the jet needle․ Bogging under load can be a symptom of either a lean or rich condition, depending on the throttle position․ Difficulty starting may indicate a problem with the pilot circuit, necessitating pilot screw adjustments․
Always address one variable at a time and meticulously document changes․ Ensure all air leaks are eliminated before attempting tuning, as leaks can mimic other issues․ Referencing reliable resources, like online forums and manuals, can expedite the troubleshooting process․ Remember, patience and methodical adjustments are key to success․
Reading Spark Plugs for Tuning
Spark plug analysis is a cornerstone of Mikuni carburetor tuning․ The plug’s color provides invaluable insight into the air-fuel mixture․ A healthy mixture is indicated by a light tan or chocolate brown color, signifying optimal combustion․ This suggests the jetting is appropriately matched to the engine and conditions․
A black, sooty plug reveals a rich mixture, meaning too much fuel is being delivered․ This can result from an oversized main jet, an incorrect float level, or a needle positioned too high․ Conversely, a white or very pale gray plug indicates a lean mixture, where insufficient fuel is present․ Potential causes include a small main jet, a low float level, or a needle positioned too low․
Examine the insulator for signs of overheating, such as a blistered or cracked appearance, which suggests a lean condition․ Carefully inspect the electrode for wear or fouling․ Always use a new spark plug for accurate readings after making significant tuning adjustments․ Consistent plug readings confirm successful tuning․
Tuning for Different Altitudes
Altitude significantly impacts air density, directly affecting carburetor tuning․ As altitude increases, air becomes thinner, requiring a reduction in fuel to maintain the correct air-fuel ratio․ Failure to adjust for altitude results in a rich mixture, leading to poor performance and potential engine damage․
When ascending to higher altitudes, the primary adjustment involves lowering the main jet size․ A general rule of thumb is to decrease the jet size by one number for every 1,000 feet of elevation gain, but this is a starting point․ The needle jet and jet needle may also require adjustment, typically raising the needle to lean out the mid-range․
Conversely, descending to lower altitudes necessitates increasing the jet size to compensate for the denser air․ Monitor spark plug readings closely during altitude changes, and make incremental adjustments․ Consider the temperature alongside altitude, as colder air is denser․ Proper altitude tuning ensures optimal engine performance and longevity․
Tuning for Different Temperatures
Ambient temperature profoundly influences carburetor performance, impacting fuel vaporization and air density․ Colder temperatures increase air density, demanding a richer fuel mixture for optimal combustion․ Warmer temperatures decrease air density, requiring a leaner mixture to prevent excessive fuel․
When temperatures drop, consider increasing the main jet size and potentially raising the needle to enrich the mixture․ Pay close attention to the pilot screw adjustment as well, as colder air requires more fuel at idle․ Conversely, in warmer conditions, decrease the main jet size and lower the needle to lean out the mixture․
Monitoring spark plug color is crucial when adjusting for temperature changes․ A slightly darker plug indicates a richer mixture, while a lighter plug suggests a leaner condition․ Remember that humidity also plays a role; higher humidity reduces air density, similar to altitude․ Consistent temperature compensation ensures reliable engine operation and prevents performance issues․
Fuel Mixture Ratios Explained

Understanding fuel-air ratios is fundamental to Mikuni carburetor tuning․ The ideal stoichiometric ratio for gasoline is approximately 14․7:1 – 14․7 parts air to 1 part fuel․ However, engines rarely operate at this precise ratio across all conditions․ Rich mixtures (less air, more fuel) provide more power but can lead to fouling and reduced fuel efficiency․
Lean mixtures (more air, less fuel) improve fuel economy but risk overheating and engine damage․ Mikuni carburetors utilize jets and needles to control fuel flow and achieve the desired ratio․ The main jet governs the mixture at wide-open throttle, while the needle controls the mid-range․ The pilot screw adjusts the low-speed mixture, crucial for idle and starting․
Adjustments are iterative; small changes to jetting or needle position significantly impact the mixture․ Spark plug readings provide valuable feedback on mixture correctness․ Aim for a tan or light brown plug color indicating a properly tuned engine․ Always prioritize safety and avoid excessively lean conditions․
Impact of Air Filter on Tuning
The air filter plays a critical, often overlooked, role in Mikuni carburetor tuning․ A clean air filter ensures a consistent and accurate air supply to the carburetor․ A restricted or dirty air filter reduces airflow, effectively creating a richer fuel mixture than intended, even with properly jetted carburetors․ This can lead to sluggish performance, fouling spark plugs, and decreased fuel efficiency․
Conversely, an overly porous or damaged air filter allows excessive airflow, leaning out the mixture․ This can cause overheating and potential engine damage․ When making carburetor adjustments, always ensure the air filter is clean and in good condition․ Consider the type of filter – paper, foam, or oiled – as each has different airflow characteristics․
Changes to the air filter necessitate re-evaluation of carburetor settings․ Upgrading to a high-flow air filter typically requires increasing jet sizes to compensate for the increased airflow․ Regular inspection and maintenance of the air filter are essential for maintaining optimal engine performance and accurate carburetor tuning;
Specific Mikuni Carb Models (VM, TM, TMX)
Mikuni produces a range of carburetors, each with unique characteristics requiring tailored tuning approaches․ The VM series, known for its versatility, is commonly found on older motorcycles and some snowmobiles․ VM tuning focuses on precise jetting and needle adjustments due to its relatively simple design․
TM series carburetors, often used in high-performance applications, feature flatter slides for improved throttle response․ TM tuning demands attention to slide spring selection alongside jetting, influencing mid-range power delivery․ The TMX series, primarily found on modern two-stroke motorcycles, incorporates a throttle position sensor and more complex circuitry․
TMX tuning requires specialized tools and knowledge, often involving fuel mapping adjustments․ Each model responds differently to changes; a jetting setting optimal for a VM carburetor won’t necessarily work on a TM or TMX․ Understanding the specific architecture of your Mikuni carburetor is paramount for successful tuning․ Always consult model-specific resources and documentation․
Carburetor Synchronization (for multi-carb setups)

When dealing with motorcycles or engines equipped with multiple Mikuni carburetors, synchronization is critical for smooth operation and optimal performance․ Uneven airflow between carburetors leads to imbalances in fuel mixture, causing issues like rough idling, poor throttle response, and reduced power․ Synchronization ensures each cylinder receives an equal amount of air and fuel․
The most common method involves using a vacuum gauge connected to each carburetor’s intake manifold․ Adjusting the throttle stop screws on each carburetor allows for equalization of vacuum readings․ This process is typically performed at idle speed, ensuring consistent airflow at low RPMs․
Precise synchronization requires patience and a keen ear․ Listen for any discrepancies in engine sound while adjusting․ Modern techniques utilize digital carb synchronizers for increased accuracy․ Regular synchronization is recommended, especially after carburetor cleaning or adjustments․ Proper synchronization maximizes engine efficiency and prevents potential damage․
Advanced Tuning Techniques
Beyond basic adjustments, advanced Mikuni carburetor tuning involves a deeper understanding of fuel curves and engine dynamics․ This often requires specialized tools and a methodical approach․ Wideband oxygen sensors (O2 sensors) are invaluable for precisely measuring air-fuel ratios across the RPM range, providing data for jetting and needle adjustments․
Dynamic tuning on a dynamometer allows for real-time adjustments while monitoring engine power output․ Analyzing spark plug readings remains a crucial skill, offering visual cues about mixture richness or leanness․ Experimenting with different jet needle tapers can fine-tune the mid-range response․
Understanding the effects of altitude and temperature is paramount for consistent performance․ Advanced tuners often modify carburetor internals, such as drilling slides or altering venturi sizes, for customized fuel delivery․ Logging data and meticulously documenting changes is essential for replicating successful results․ This level of tuning demands experience and a thorough grasp of engine principles․
Resources for Further Learning
Mastering Mikuni carburetor tuning requires continuous learning and access to reliable information․ YouTube channels, such as those demonstrating Mikuni snowmobile carburetor adjustments (e․g․, videos found at youtube․com/watch?v=teJeKM-ot1A), offer visual guides and practical demonstrations․ Online blogs and forums dedicated to motorcycle and snowmobile tuning provide valuable insights from experienced enthusiasts․
Websites like storage․googleapis․com host detailed guides on specific adjustments, such as needle adjustments․ Manufacturer’s service manuals are indispensable for understanding the intricacies of individual Mikuni carburetor models (VM, TM, TMX)․ Ruclips․net provides access to a range of instructional videos․
Consider joining online communities to exchange knowledge and troubleshoot issues with fellow tuners․ Exploring resources on fuel mixture ratios and the impact of air filters will deepen your understanding․ Mungfali․com offers information on carburetor component replacement․ Remember to critically evaluate information and cross-reference sources for accuracy․